More and more often, adversaries target and exploit Internet-facing appliances or devices with exotic or restricted operating systems. Users ask if there is a way to run a compromise assessment scan on these systems with the YARA rules used in THOR.
Following up on the exploitation of Internet-facing ESXi servers, this blog post describes ways to remotely scan remote systems like an ESXi using THOR or the free THOR Lite YARA and IOC scanners. This method can also be be used to scan other devices usually unsupported by real-time Antivirus engines or EDRs, e.g. Citrix Netscaler gateways.
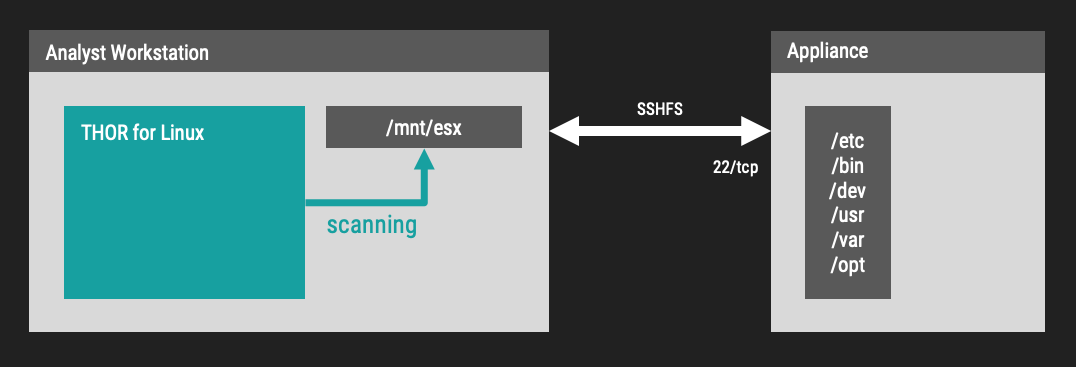
So, we plan to mount the remote file system using SSH (SSHFS) and then we instruct THOR to scan the mounted remote filesystem.

Prerequisites
- We need to reach port 22/tcp on the target system
- A source system with support for sshfs (on Debian use:
sudo apt install sshfsto install it) - A version of THOR Lite or the full THOR with a lab license
Mounting the Remote File System via SSH
First we create a new folder and mount the remote file system to that local folder:
sudo mkdir -p /mnt/esx
sudo sshfs -o reconnect root@esx1.company:/ /mnt/esx
The -o reconnect option makes sure to reconnect the
Scanning the Mount Point with THOR Lite
With THOR Lite we can now run a so-called “Filescan” on the mounted drive.
sudo ./thor-lite-linux-64 -a FileScan --alldrives -p /mnt/esx
The following scan is much more intense as it scans every single file regardless of its extension or type. Scanning every file usually leads to much longer scan times and higher network load. (be careful when using the --intense flag)
sudo ./thor-lite-linux-64 -a FileScan --alldrives -p /mnt/esx --intense
Scanning the Mount Point with THOR
With a full featured THOR and a so-called Lab license we can use the –virtual-map flag to virtually map the folder /mnt/esx to / internally. This means that signatures and filename patterns that make use of the virtual and not the actual path. We can also define a hostname that will appear in the log file using the -j flag. Otherwise the log would always contain the hostname of the scanning workstation.
sudo ./thor-linux-64 -a FileScan --alldrives -p /mnt/esx
Using the full version, we would use a different flag combination for a more intense scan of the remote system. The full version with a lab license allows us to use the --lab flag.
sudo ./thor-linux-64 --lab -p /mnt/esx --virtual-map /mnt/esx:/ -j esx1
The --lab flag automatically activates the intense scan mode that checks every file, multi-threaded scanning, deactivates resource control and some other flags that can be useful in a lab scanning scenario.
Example Match
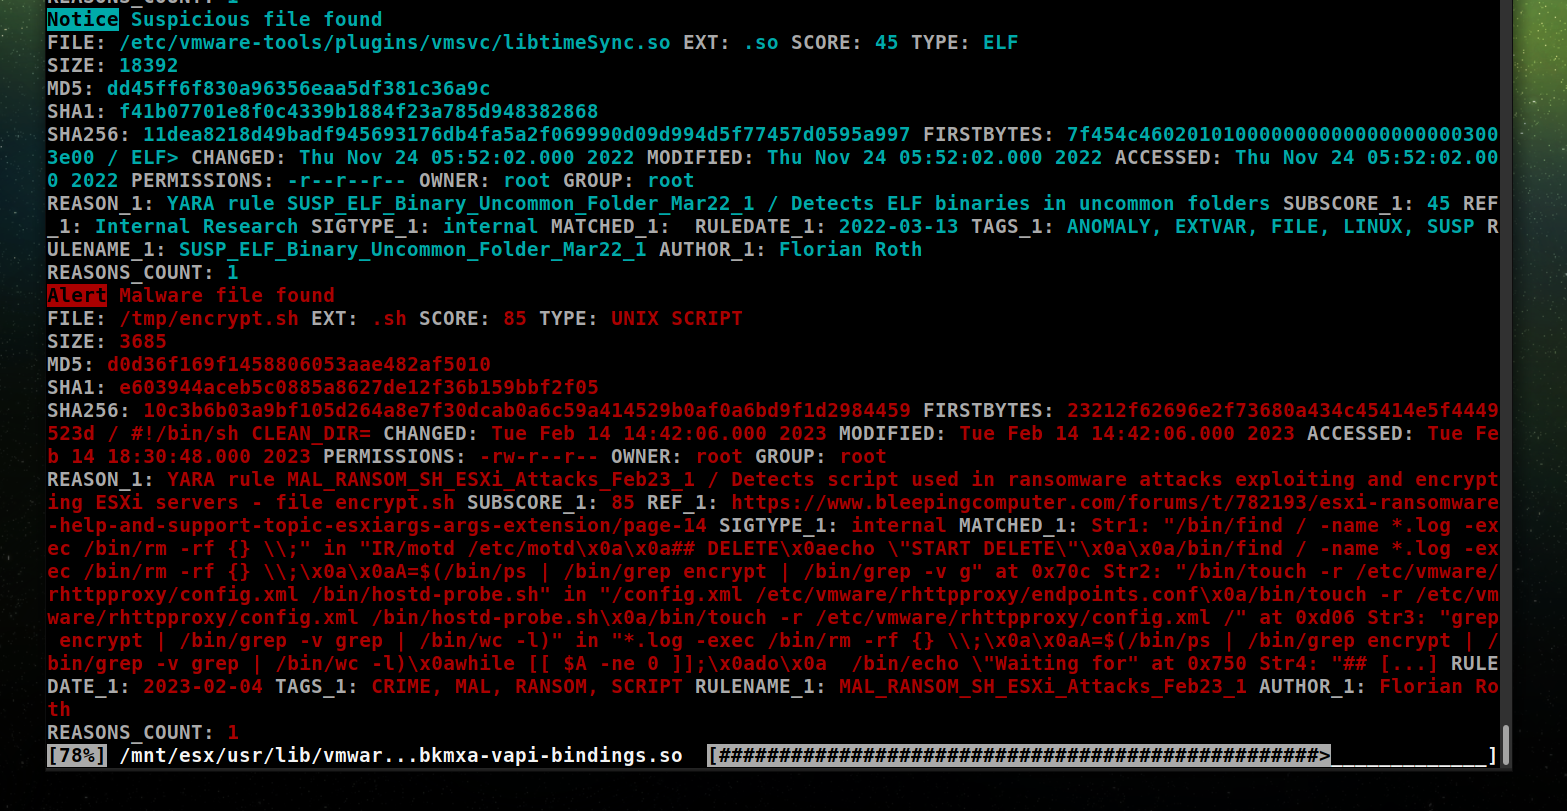
The following screenshot shows an example match on a malware found on systems affected by the ESXiArgs attacks. The rules and IOCs for this attack are available in THOR and the free THOR Lite version.

Other Notes
- Test scans on our internal ESX/ESXi systems took between 8 and 30 minutes. (scans via VPN)
- A network disconnect only pauses the scan, a forced umount crashes the scanner.
- We tested network disconnects of 1 and 5 minutes. After a reconnect THOR just resumes the scan where it left off.
Advantages of the full THOR version
Apart from the usual advantages of the full THOR version over THOR Lite, there are a few more reasons to use the full version in this scenario:
- Use multiple instances on a single source system to scan many different remote systems at the same time
- Use virtual drive mapping to allow for additional detection opportunities
- Set a custom host name that appears in the log files (helpful when you scan many different targets)
If you’re interested in the full version, contact us using the “Get Started” button in the upper right corner.


